Saturday, March 24, 2018

Epic Alex

Hello friends! I am sharing a boy layout over at A Flair For Buttons today of this cute little guy.


I've had this collection of papers, stickers from the Max Collection by Bella Blvd. in my stash for quite a while. I used flair buttons from A Flair For Buttons to add some more pizzaz to my layout. The black "epic" flair button from the Epic Flair Set was used as part of the title of the page. 


and I also placed the "boy" flair buttons from the All Boy 2 Flair Set to the right of the photo. I glued it on top of round green sticker to make it more visible. I wanted to draw the eye to the photo. 


Flair can be used not just as an embellishment, but it can be strategically used to draw the eyes to the photo.

Thanks for stopping by and be sure to check out the A Flair For Buttons shop for these and many awesome flair sets. There have been many new sets added to the store recently.

Happy creating!


Tuesday, March 20, 2018

My Creative Scrapbook March Tutorial

Hello scrappy friends! It's Lee-Anne here on the blog and today I wanted to share a simple and fun technique on how to create paint splats on scrapbook layouts.

I don't know about you, but sometimes I think it's fun to play with paints and other mediums to create something a little more artsy.

Remember that in scrapbooking, there are no mistakes and my motto is to just have fun and enjoy the process.


For my layout, I backed the Floral Globe cut file, which is cut with my electronic die cutting machine on one of the sheets of patterned paper from the March Creative Kit, with a piece of white cardstock of which I added my teal and coral paint splats. 

I also wanted to mention that there are always several exclusive complimentary cut files included in the kits each month that can be cut with a Silhouette Cameo, Cricut, or Brother Scan N Cut electronic die cutting machines. 


I will show you how I created the paint splats. Let's begin.

Supplies For Paint Splats

Craft Mat
Heat Gun
1 - 12X12 or 8 1/2 X 11 Sheet of White Cardstock
Acrylic Paint Daubers - I used two colors - teal and coral
Water Mister
Water
Paint Brush or Water Brush - to mix the paints

Instructions
  1. Shake paint bottle well and with the the paint dauber, apply some paint to the craft mat.
  2. Fill a mister with water and spritz a small amount of water and combine the paint and water      adding enough water so that the paint is a fairly thin consistency.
  3. Place the paint dauber into the paint picking of some of the paint and "stamp" the white cardstock. If the paint is a thin consistency, it should create a paint splat with tiny little trails.  Let dry.  
  4. Repeat with the other paint dauber making sure that there are several paint splats in both teal and coral. Let dry.
  5. Now you can back the paint spatted white cardstock behind the floral globe design. Trim and machine stitch if desired.
  6. Voila! You have created paint splats!
Check out some of the photos below of my paint splats:


I hope you enjoyed my quick tutorial on how to create fun paint splats. It takes a little practice so be sure to practice on some scrap pieces of cardstock first before creating your project. Have fun!

Be sure to check out all the wonderful kits at My Creative Scrapbook

Thanks for stopping by and happy creating!


Sunday, March 18, 2018

Kitty

Hello friends! Happy Sunday.

I'm sharing another layout for A Flair For Buttons of my cute kitty Asia. She has crossed the rainbow bridge a few years back, but I wanted to honor her with a scrapbook layout. Asia will always hold a special place in my heart. She didn't have it good for a while because when we adopted her from a local shelter, she was in a cage for 4 months. It was a no kill shelter, but I think it affected her. She had her quirks, but we loved her.


For my layout, I used a black chevron arrow flair button from the Inspirational Words 4 Flair Set. I placed it to the left of a journaling card and the photo to direct the eye to the photo.


As you have probably noticed, I have a LOT of stitching on this layout. I used my trusty old sewing machine for making a grid pattern on my white card stock background after I used some Distress Oxide Inks in Cracked Pistachio and Tumbled Glass.

I also machine stitched with my pink We R Memory Keepers Stitch Happy Sewing Machine, that I bought a year ago, with some aqua thread and also citrine thread. It is really not straight stitching because the stitching guide on that machine kept sliding out of place. Oh well. I accepted that it wasn't perfect and straight and decided to go with it. The benefit of the Stitch Happy machine is that it can stitch with twine and that makes me happy. It's always fun to try something different.


All the patterned papers on this layout are from the adorable Doodlebug Design Kitten Smitten Collection that I have been hoarding for some time now. I also added some ephemera from the same collection. The wire cat embellishment is from Maya Road and I wanted to be sure to find a place to add it to the layout.


I added some twine around the flair button for some extra texture and popped up some of the embellishments with foam squares for more dimension.


Thanks for stopping by and be sure to check out all the flair in the A Flair For Buttons shop.

Happy creating!

Flair On This Layout

Inspirational Words 4 Flair Set


Saturday, March 17, 2018

Blessed To Be Your Mom

Hi friends! I always love created family themed layouts and this one of my daughter and I is no exception.

The March Sketch for My Creative Scrapbook was my starting point.  Fellow design team member Laura Whitaker designed the sketch. I love the simplicity of the sketch.

I used the March Creative Kit and an exclusive cut file, that are included in the kits, on my layout.


I love the circle alpha stickers included in the kit to add to my title. 


I really love the colors of the papers in this kit and the feather patterned paper that is so trendy. I added some chipboard elements to the layout to give it more dimension and interest.


Be sure and play along with My Creative Scrapbook and the monthly sketches. Check out all the details on prizes that can be won just by uploading your take on the sketch.  

Happy creating!


Tuesday, March 13, 2018

Some Cards

Hi scrappy friends!

I thought I would share some of my cards that I created with the fun March Creative Kit for My Creative Scrapbook. I am really digging making cards these days. As you probably noticed, I'm more of layout kind of gal, but when there are so many beautiful scraps left over from the kits, I thought that it was a good idea. It takes me out of my comfort zone and it's fun to give cards to friends and family for a pick me up.


I love the rub ons in the kit. They are very good quality and I thought they were nice to use as my sentiments on the cards.


As you can see, I love the texture that stitching, whether it's a sewing machine or hand stitching creates on the cards. It gives it more of a homemade feel that I love.


Thanks for stopping by. Happy scrapping!


Sunday, March 11, 2018

Boys Rule

Hello scrappy friends! I hope you are enjoying your weekend. Today I wanted to share a masculine layout for A Flair For Buttons.

Yes, it's been quite a while since I've made a boy page and it felt good. I decided to do some major stash busting so I dug deep into my paper stash and found this older paper collection by Bella Blvd. that is perfect for boys. It's the Max Collection, which I believe is a winter release from 2014.


I arranged lots and lots of patterned paper strips along the bottom half of my white cardstock background  and machine stitched them in place with my vintage sewing machine in white thread.

For the photo of my son, I backed it with some scraps of Bella Blvd. papers from some various older collections and then added some stickers and of course a black heart flair button from A Flair For Buttons Just Hearts 2 Flair Set. Everything is better with hearts. I love hearts and heart flair buttons are no exception.
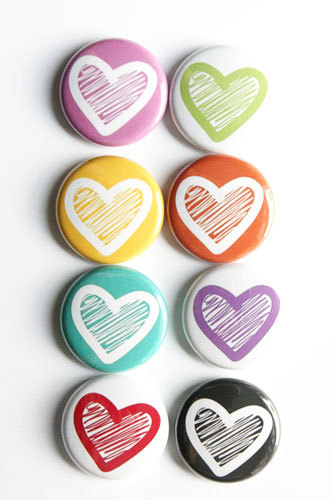


Just Hearts 2 Flair

For the title "Boys Rule", I added some old green chipboard alpha stickers, that have also been in my stash for some time, that are also from Bella Blvd. To make the title even more fun, I added a yellow star flair button from the My Life 4 Flair Set to replace the "o" in the word "Boys".


My Life 4 Flair Set

Finally, I added some star enamel shaped stickers in black, yellow and orange to give it a little more interest and dimension to the white cardstock background. I also added my son's name and date, when the photo was taken, with an acid free black fine line marker.


Voila! The layout is all done.


I really had fun creating this boy layout and flair buttons are my absolute favorite embellishment to add some more pizzaz to any paper project.

Be sure and check out all the flair buttons in the A Flair For Buttons store today. There are virtually hundreds to choose from in so many colors and themes.

Thanks for visiting and happy creating!


Monday, March 5, 2018

My Creative Scrapbook March Reveal


Hello crafty friends!  I hope you all had a nice weekend. Today is the exciting March reveal over at My Creative Scrapbook. I was lucky to create with the March Creative Kit. Isn't it great?

March Creative Kit

March Main Ki

March LE Kit
March Album Kit

Here are my projects that I created with the March Creative Kit.


I hope you are inspired by my projects. As you can see, the kits are jam packed with lots of product. Be sure reserve your kits today at My Creative Scrapbook and while you are there, check out the designer gallery for lots more inspiration.

Happy creating!